A Microsoft Power Automate Custom Connector step-by-step from scratch: Facebook API

In this post, I will show you a quick example on how to setup a custom connector from scratch for Facebook in Microsoft Flow (or PowerApps and LogicApps).
Setting up a custom connector enables:
- to create your own specialized actions and triggers, which are not yet part of an existing connector
- to connect to services, systems and APIs, which are not among the predefined 180+ connectors
Prerequisites
Although this post intends to show a full example, to be more confident setting it up, you should get familiar with these topics:
- Microsoft Flow: https://docs.microsoft.com/en-gb/flow/
- OAuth 2.0 authorization protocol: https://oauth.net/2/
- Facebook Graph API: https://developers.facebook.com/docs/graph-api
Register a Facebook application
To use the Facebook API, you need a Facebook application. There is a lot of reasons behind it (read original thoughts here: LINK), but as a summary: it makes your life more secure and provides an extra layer to control permissions.
Every application has an app ID and a secret (both auto generated): app ID is the public identifier of the application, while the secret is like a password, and you should treat it that way! You will need both to connect to the API.
The official documentation is surprisingly useful, so I won’t repeat the steps: https://developers.facebook.com/docs/apps/register/
My additional notes:
- to test your connector, you don’t need to provide any information (e.g. Privacy URL) apart from it’s name
- to test your connector, you don’t need the additional steps (e.g. Platform, Advanced Settings, Test Users)
- to test your connector, you don’t have to make your app public, it can stay in development state
- you can only have one client secret, which unfortunately does not expire.. Though you can easily reset it with a single click
Create the custom connector
- You will need either one of the Flow Plan licence, an O365 Business Premium subscription or a trial version
- Log in to MS Flow: https://flow.microsoft.com/
- Follow the official step-by-step: https://docs.microsoft.com/en-us/connectors/custom-connectors/define-blank
- * scheme: HTTPS
* host: graph.facebook.com
* base URL: leave the default
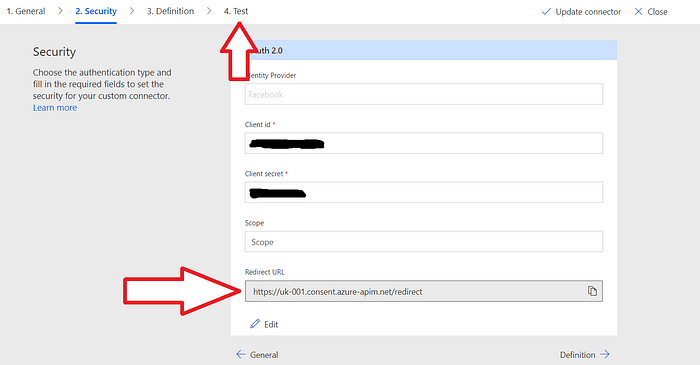
* authentication type: OAuth 2.0
* Identity provider: Facebook
* client ID & client secret: copied from the FB application settings
* scope: leave the default for now (empty) - Hit “Create connector” without defining any action or trigger.
- Click again on the “Security” tab, and copy the newly generated redirect URL!
- Follow the steps written HERE to add the “Facebook login” product to your Facebook application, and to set the redirect URL, which you have just obtained.

Now, that the connector has been created, test it under the “Test” tab, hitting the “New connection” button! You will be either represented with a hopefully descriptive error message, or the well-known Facebook consent window.
Final thoughts
This connector is only authorized to retrieve the user’s name and profile picture by default.
To have more room, you will need to define permissions for your application under the “App review” tab on the Facebook developer site. Doing so, you also have to submit the application for review, and then go public with it, but more on this later in another post.
Today, most of the leading web portals and services (e.g. Twitter, Instagram, GitHub, VSTS, Jenkins, MS Teams, Slack, Spotify, …) provide API endpoints, which can be used by developers to interact with their internal data.
To create a custom connector — to integrate a service into your Flow — the steps to be followed are quite similar to what I have shown. That said, if requested, I can cover other scenarios too.
