A Microsoft Power Automate Custom Connector step-by-step from scratch: Microsoft Teams

I will show you a quick example on how to set up a service-to-service custom connector in MS Flow (//PowerApps//LogicApps), that works with MS Teams.
Setting up a custom connector enables you:
- to create your own specialized actions and triggers, which are not part of an existing connector
- to connect to services, systems and APIs, which are not among the predefined 180+ connectors
Check my own sibling post on How to setup custom connector to Facebook!
Prerequisites
Although this post intends to show a full example, to be more confident setting it up, you should be familiar with these topics:
- Microsoft Flow: https://docs.microsoft.com/en-gb/flow/
- OAuth 2.0 authorization protocol: https://oauth.net/2/
- MS Graph reference: https://developer.microsoft.com/en-us/graph/docs/concepts/overview
Register an application
To use Microsoft Graph (connects you to MS Teams), you need a registered application with an identity provider. Bunch of reasons behind this (read original thoughts here: LINK), but as a summary: it makes life more secure and provides an extra layer to control permissions.
Now, we will use Azure. In Azure AD, you can register your application either as a web or a native app. Go with web application, as that allows the service-to-service scenario (provides a secret).
- Open portal.azure.com with your organisation account
- Select “Azure Active Directory” blade on the left
- Click “switch directory” if your account has permission to multiple, and is currently sitting in the wrong one
- Select the “app registration” blade
- Click “new application registration”
* Name: give a descriptive name e.g. “MS Flow Test Connector”
* Application type: Web app / API
* Sign-on URL: e.g. https://login.windows.net - Hit create and copy the
application IDas that is ourclient ID - Click “Settings”, and under the “Keys” blade create a new key. The value will only be shown once after save! This will be the
client secret, so copy it. - Hit “Required permissions” tab, and add Microsoft Graph with at least the “Read and write all groups” permission.
- Navigate back to the Azure AD blade, and on the “App registrations” tab, select “Endpoints” in the top. Copy the OAuth token and authorization endpoints (bottom two).
Create the custom connector
- As license, you need either: Flow Plan 1 // Flow Plan 2 // O365 Business Premium // a trial version
- Log in to MS Flow: https://flow.microsoft.com/
- Follow the official step-by-step: https://docs.microsoft.com/en-us/connectors/custom-connectors/define-blank
- * scheme: HTTPS
* host: graph.microsoft.com
* base URL: leave default - * authentication type: OAuth 2.0
* Identity provider: Azure Active Directory
* client ID & client secret: copied from registered application
* login URL: leave default
* tenant ID: leave default
* resource URL: https://graph.microsoft.com
* scope: https://graph.microsoft.com/.default - This will give all the permissions for the connector, that you specified in Azure. If you want to constrain it, change it to e.g.
Group.ReadWrite.All. - Hit “Create connector” without defining any action or trigger.
- Click again on the “Security” tab and copy the newly generated redirect URL.
- Navigate in Azure portal to your application, and in Settings under the “Reply URLs” blade add in the obtained redirect URL.

Now, that the connector has been created, test it under the “Test” tab, hitting the “New connection” button! (This is not yet available in LogicApps).
Create custom action
Being on the “Definition” tab, we can create actions or triggers, which are part of our new connector. I will create an action, which will allow us to retrieve all teams in the organisation (preview feature, don’t use in production!)
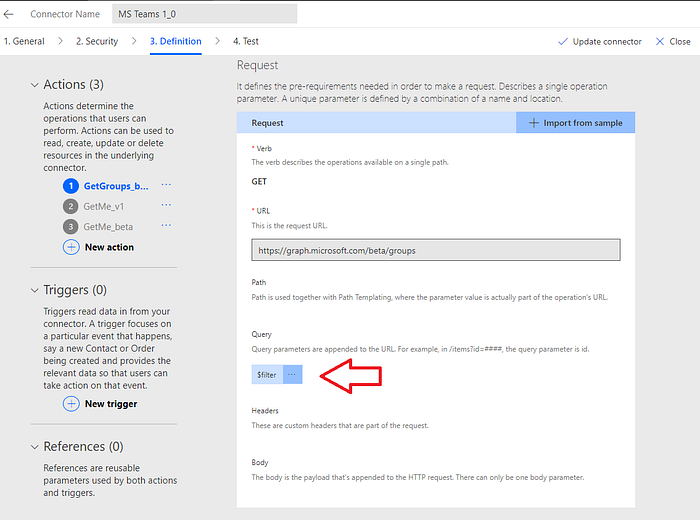
- Hit “New action” button on the left. Use descriptive names, as you can only have one action per Method+Path combination!
* summary: “Get groups”
* description: “Retrieves all groups from the organization”
* operation ID: “GetGroups” - Hit “Import from sample” in the Request section
- Select GET, and add a URL with all possible parameters, then hit import. Example:
https://graph.microsoft.com/beta/groups?$filter=resourceProvisioningOptions/Any(x:x eq ‘Team') - Flow will create query elements out of the parameters: a blue box turned up under the Query section, and our URL got trimmed.
- Hit the three dots to define a name and a description for the created parameter.
- You may notice that our defined filter string has disappeared too: it can be set when using this action. Save it for later, as using that you will be able to retrieve all teams in your organisation!
- For now, leave Response and Validation sections intact, and click “Update connector”.
- Under Test tab, check your new operation: “Test operation”.
Final thoughts
Different identity provider
Joining the new wave, we can play around and register our application on https://apps.dev.microsoft.com, following the official guidance. Here, we can have a single application (just one ID) registered for multiple purposes.
Don’t forget to add the “web” platform with the generated redirect URL! In this scenario, choose “Outlook” as your identity provider for the connector.
Export and import
Yes, this is possible! When reviewing your connectors, hit the download button, which will create an OpenAPI file. This JSON can be used to create a new connector — though you have to manually fill in the client ID and secret.

Today, most of the leading web portals and services (e.g. Twitter, Instagram, GitHub, VSTS, Jenkins, MS Teams, Slack, Spotify, …) provide API endpoints, which can be used by developers to interact with their internal data.
To create a custom connector — integrate a service into your Flow — the steps to be followed are usually similar to what I have shown here. That said, if requested, I can cover other scenarios too, and stay tuned for more posts!

